
Take Control of iPhone and iPod Touch Networking
The iPhone has a 3G modem built into it that lets the phone access high-speed mobile data and voice networks. So why can’t we use that same built-in modem with our laptops when we’re traveling instead of having to buy a separate 3G modem or cellular router for the computer and pay a separate monthly service fee?
The good news is that you can, more or less, using tethering. Tethering lets you turn a phone into a cellular modem, but with substantially more limits than alternatives such as cellular routers or mobile hotspots. Tethering is one to one (you connect a phone to a laptop), and the laptop must have the right drivers to make it work.
In contrast, cellular routers, which are standalone devices, and mobile hotspots, which are a feature on some cell phones, share a cellular connection via Wi-Fi.
Carriers outside the United States started offering tethering with the 2009 release of iPhone OS 3 (now called iOS 3). AT&T promised tethering, but didn’t deliver until iOS 4 shipped in 2010.
The system requirements for iPhone tethering are Mac OS X 10.5.8 or later (though 10.4.11 may work for Bluetooth). You’ll also need iTunes 9.2 or later, as well as a USB 2.0 port or support for Bluetooth 2.0. (In case you were wondering, you can’t tether an iPhone to an iPad or vice versa with a 3G iPad. It’s a shame, because otherwise you could own a cheaper iPad—the Wi-Fi-only model—and use the iPhone as its data source instead of managing two separate 3G plans to have active service.)
Note: You can use tethering with a desktop computer, but you’re unlikely to travel with one. Tethering is meant as a nomadic option for mobile use because it is more expensive than most other options. For a stationary computer, look into fixed wireless service or WiMax if wired broadband isn’t an option.
Pay for tethering
Outside the United States, some carriers charge to enable tethering service, even though you’re already paying the carrier for data consumption. In the United States, AT&T once had an argument for charging for tethering when it offered unlimited data plans. But now that AT&T has discontinued those plans, there’s no excuse for the fee it charges.
The myWireless app lets you change billable account features like tethering.
AT&T customers use the company’s free myWireless app to change a data service plan and toggle tethering on or off. It’s far simpler than using AT&T’s Website.
If AT&T is not your carrier, and your carrier offers tethering, follow instructions in the Settings app. Tap General -> Network -> Set Up Internet Tethering.
Turn on tethering
After you’ve added tethering to your data carrier account, go to Settings -> General -> Network -> Internet Tethering. In the Internet Tethering pane, tap the Internet Tethering switch to On.With tethering on, you can plug an iPhone into a laptop via USB or pair the phone’s tethering service with your computer over Bluetooth:
- USB gives you a high-speed data connection that you know works as long as the cable isn’t bad. The downside? Being literally tethered.
- Bluetooth requires more steps to make a connection active, but it gives you the cable-free flexibility.

A banner lets you know whenever your phone is acting as a cellular modem for a computer, whether over USB or Bluetooth.
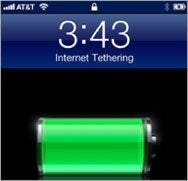
The Lock screen also shows whether tethering is active or not.
I explain how to make the each type of connection next.
Tether with USB
With tethering enabled on the iPhone, connect your iPhone to your computer using a USB cable.Oddly, you must launch iTunes after connecting your iPhone for the first time, even if you don’t normally use this computer for syncing. I’ve found that you must launch iTunes only once after connecting via USB; on subsequent occasions, the system remembers that it can use a tethered phone. (If you don’t have iTunes installed already, download it from Apple. It can take several minutes to install, and the installer will prompt you a few times to approve various components.)
Once you’ve launched iTunes, follow the directions below.
An entry appears in the adapters list.
Not active? Make sure you’ve launched iTunes, a required step, even though iTunes doesn’t seem to have anything to do with tethering.
To halt the active tethering connection, you can do any of the following:
- On the iPhone, tap Settings -> General -> Network -> Internet Tethering and set the Internet Tethering switch to Off.
- Disconnect the USB cable.
- In the Network preferences pane in Mac OS X, select the iPhone USB adapter, and then from the gear menu, choose Make Service Inactive. Click Apply in the lower-right corner.
Tether with Bluetooth
On your iPhone, make sure Bluetooth is turned on—look in the Settings app, in General -> Bluetooth. Once you’re sure it’s enabled, turn on tethering on your Mac.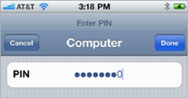
Enter the Mac-generated PIN on your iPhone.
- Launch System Preferences, and select the Bluetooth pane.
- Click the plus button to the lower left. This launches the Bluetooth Setup Assistant.
- Your iPhone should appear in the list of devices; if not, check that Bluetooth is enabled on the iPhone and that it’s within a few dozen feet of your computer. Select the phone, and click Continue. On the assistant’s next screen, an 8-digit code appears. On the iPhone an entry dialog pops up, as seen in the figure above and to the right.
- Enter the assistant’s code on the iPhone, and tap Done. If you entered the PIN code correctly, in a moment, the assistant tells you “Congratulations!”
- Click Quit.
- Now, in System Preferences, click Show All, then select Network.
- In the adapters list at left, you’ll notice a new Bluetooth PAN entry; PAN stands for personal area network, and it’s the kind of network that Bluetooth is. Your iPhone should be selected in the Device pop-up menu. Click Connect.
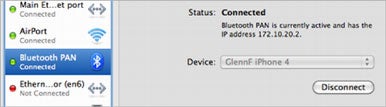
The iPhone is now tethered to the Mac and active.
To disconnect Bluetooth tethering, you can do any of the following:
- In the Network preference pane, with Bluetooth PAN selected in the adapters list, click the Disconnect button.
- On your iPhone, in the Settings app, tap General -> Network -> Internet Tethering and tap the Internet Tethering switch to Off.
- Turn off Bluetooth networking on either the iPhone (Settings -> General -> Bluetooth) or Mac (Bluetooth system preferences pane).


No comments:
Post a Comment