Monday, October 31, 2011

How ToTrace a Mobile Numbers


  Now We know how growth up the mobile phone in this world and we know too that the mobile phone a part of the criminal activity like fraud force of other when we get some like shopping online and may be we don't have some a specific for some one but use with phone number we have request for something like for purpose fraud and force for something like that .. so how we can to avoid to save our life from fraud or other trough mobile phone number ... okay just check my post and find save your life for it........


Even though it is not possible to trace the number back to the caller, it is possible to trace it to the location of the caller and also find the network operator. Just have a look at this page on this link from Wikipedia. Using the information provided on this page, it is possible to certainly trace any mobile number from India and find out the location (state/city) and network operator (mobile operator) of the caller. All you need for this is only the first 4-digit of the mobile number. In this Wiki page you will find all the mobile number series listed in a nice tabular column where they are categorized based on mobile operator and the zone (state/city). This Wiki page is updated regularly so as to provide up-to-date information on newly added mobile number series and operators. I have used this page many a time and have never been disappointed.
If you would like to use a simpler interface where in you can just enter the target mobile number and trace the desired details, you can try this link from Numbering Plans. Using this link, you can trace any number in the world.
By using the information in this article, you can only know “where” the call is from and not “who” the caller is. Only the mobile operator is able to tell you ”who” the caller is. So if you’re in an emergency and need to find out the actual person behind the call, I would recommend that you file a complaint and take the help of police. I hope this information has helped you! And don't forget pass you are comment and follow my blog thanks.
READ MORE - How ToTrace a Mobile Numbers

List of CMD Command

  The general to use CMD for to take your easy working .. so if you use CMD of course you are use too some command .so in this post section i will know you some command of CMD .. it's not complete but it's can help you to know some of command in CMD check my post right now .....
ANSI.SYS Defines functions that change display graphics, control cursor movement, and reassign keys.
APPEND Causes MS-DOS to look in other directories when editing a file or running a command.
ARP Displays, adds, and removes arp information from network devices.
ASSIGN Assign a drive letter to an alternate letter.
ASSOC View the file associations.
AT Schedule a time to execute commands or programs.
ATMADM Lists connections and addresses seen by Windows ATM call manager.
ATTRIB Display and change file attributes. BATCH Recovery console command that executes a series of commands in a file.
BOOTCFG Recovery console command that allows a user to view, modify, and rebuild the boot.ini BREAK Enable / disable CTRL + C feature.
CACLS View and modify file ACL's.
CALL Calls a batch file from another batch file. CD Changes directories.
CHCP Supplement the International keyboard and character set information.
CHDIR Changes directories.
CHKDSK Check the hard disk drive running FAT for errors.
CHKNTFS Check the hard disk drive running NTFS for errors.
CHOICE Specify a listing of multiple options within a batch file.
CLS Clears the screen.
CMD Opens the command interpreter.
COLOR Easily change the foreground and background color of the MS-DOS window.
COMP Compares files.
COMPACT Compresses and uncompress files.
CONTROL Open control panel icons from the MS-DOS prompt.
CONVERT Convert FAT to NTFS.
COPY Copy one or more files to an alternate location.
CTTY Change the computers input/output devices.
DATE View or change the systems date.
DEBUG Debug utility to create assembly programs to modify hardware settings.
DEFRAG Re-arrange the hard disk drive to help with loading programs.
DEL Deletes one or more files.
DELETE Recovery console command that deletes a file.
DELTREE Deletes one or more files and/or directories.
DIR List the contents of one or more directory.
DISABLE Recovery console command that disables Windows system services or drivers.
DISKCOMP Compare a disk with another disk.
DISKCOPY Copy the contents of one disk and place them on another disk.
DOSKEY Command to view and execute commands that have been run in the past.
DOSSHELL A GUI to help with early MS-DOS users.
DRIVPARM Enables overwrite of original device drivers.
ECHO Displays messages and enables and disables echo.
EDIT View and edit files.
EDLIN View and edit files.
EMM386 Load extended Memory Manager.
ENABLE Recovery console command to enable a disable service or driver.
ENDLOCAL Stops the localization of the environment changes enabled by the setlocal command. ERASE Erase files from computer.
EXIT Exit from the command interpreter.
EXPAND Expand a Microsoft Windows file back to it's original format.
EXTRACT Extract files from the Microsoft Windows cabinets.
FASTHELP Displays a listing of MS-DOS commands and information about them.
FC Compare files.
FDISK Utility used to create partitions on the hard disk drive.
FIND Search for text within a file.
FINDSTR Searches for a string of text within a file.
FIXBOOT Writes a new boot sector.
FIXMBR Writes a new boot record to a disk drive.
FOR Boolean used in batch files.
FORMAT Command to erase and prepare a disk drive.
FTP Command to connect and operate on a FTP server.
FTYPE Displays or modifies file types used in file extension associations.
GOTO Moves a batch file to a specific label or location.
GRAFTABL Show extended characters in graphics mode.
HELP Display a listing of commands and brief explanation.
IF Allows for batch files to perform conditional processing.
IFSHLP.SYS 32-bit file manager.
IPCONFIG Network command to view network adapter settings and assigned values.
KEYB Change layout of keyboard.
LABEL Change the label of a disk drive.
LH Load a device driver in to high memory.
LISTSVC Recovery console command that displays the services and drivers.
LOADFIX Load a program above the first 64k.
LOADHIGH Load a device driver in to high memory.
LOCK Lock the hard disk drive.
LOGON Recovery console command to list installations and enable administrator login.
MAP Displays the device name of a drive.
MD Command to create a new directory.
MEM Display memory on system.
MKDIR Command to create a new directory.
MODE Modify the port or display settings.
MORE Display one page at a time.
MOVE Move one or more files from one directory to another directory.
MSAV Early Microsoft Virus scanner.
MSD Diagnostics utility.
MSCDEX Utility used to load and provide access to the CD-ROM.
NBTSTAT Displays protocol statistics and current TCP/IP connections using NBT NET Update, fix, or view the network or network settings
NETSH Configure dynamic and static network information from MS-DOS.
NETSTAT Display the TCP/IP network protocol statistics and information.
NLSFUNC Load country specific information.
NSLOOKUP Look up an IP address of a domain or host on a network.
PATH View and modify the computers path location.
PATHPING View and locate locations of network latency.
PAUSE Command used in batch files to stop the processing of a command.
PING Test / send information to another network computer or network device.
POPD Changes to the directory or network path stored by the pushd command.
POWER Conserve power with computer portables.
PRINT Prints data to a printer port.
PROMPT View and change the MS-DOS prompt.
PUSHD Stores a directory or network path in memory so it can be returned to at any time.
QBASIC Open the QBasic.
RD Removes an empty directory.
REN Renames a file or directory.
RENAME Renames a file or directory.
RMDIR Removes an empty directory.
ROUTE View and configure windows network route tables.
RUNAS Enables a user to execute a program on another computer.
SCANDISK Run the scandisk utility.
SCANREG Scan registry and recover registry from errors.
SET Change one variable or string to another.
SETLOCAL Enables local environments to be changed without affecting anything else.
SETVER Change MS-DOS version to trick older MS-DOS programs.
SHARE Installs support for file sharing and locking capabilities.
SHIFT Changes the position of replaceable parameters in a batch program.
SHUTDOWN Shutdown the computer from the MS-DOS prompt.
SMARTDRV Create a disk cache in conventional memory or extended memory.
SORT Sorts the input and displays the output to the screen.
START Start a separate window in Windows from the MS-DOS prompt.
SUBST Substitute a folder on your computer for another drive letter.
SWITCHES Remove add functions from MS-DOS.
SYS Transfer system files to disk drive.
TELNET Telnet to another computer / device from the prompt.
TIME View or modify the system time.
TITLE Change the title of their MS-DOS window.
TRACERT Visually view a network packets route across a network.
TREE View a visual tree of the hard disk drive.
TYPE Display the contents of a file.
UNDELETE Undelete a file that has been deleted.
UNFORMAT Unformat a hard disk drive.
UNLOCK Unlock a disk drive.
VER Display the version information.
VERIFY Enables or disables the feature to determine if files have been written properly.
VOL Displays the volume information about the designated drive.
XCOPY Copy multiple files, directories, and/or drives from one location to another.
TRUENAME When placed before a file, will display the whole directory in which it exists
keep this work and remember .. and don't forget to pass you are comment to support me back thanks.
READ MORE - List of CMD Command

How to use an unlocked iPhone 4 with T-Mobile


Now that Apple sells unlocked iPhone 4s to U.S. customers, budget- or carrier-conscious buyers may wonder whether they can buy an iPhone 4 and use it with T-Mobile. Although T-Mobile has its own 3G network, it doesn’t use the same frequencies as AT&T's; thus the most a T-Mobile iPhone customer can hope for in the U.S. is slower, EDGE (2G) data speeds. Even if you’re willing to settle for slower downloads in exchange for jumping onto T-Mobile’s network with a legitimate, unlocked, non-jailbroken iPhone, there’s a bit of work involved. So I visited a local Apple Store and purchased an unlocked iPhone 4 (in white, natch) and set out on my journey. Here's what I did to get connected.

SIM versus micro-SIM


First, you’ll need a T-Mobile SIM card. If you already have a T-Mobile phone, you already have just such a SIM card; pop it out of your phone, and you’re good to go. You can also go to T-Mobile’s website or a local T-Mobile store and pick up a prepaid or pay-as-you-go SIM card. I bought one for $10 at my local store. There is a catch, though: The iPhone 4 doesn’t include a SIM slot. Rather, Apple uses a slimmer SIM, the micro-SIM. As it turns out, a micro-SIM is actually just a SIM that’s undergone some serious trimming.
Presumably at some point T-Mobile will realize there's now an opportunity to reach users of unlocked iPhones and offer micro-SIMs as well as standard SIM cards. (When we called T-Mobile's PR department, they declined to comment about the unlocked iPhone.) In the interim, then, you'll need to make your own micro-SIM.
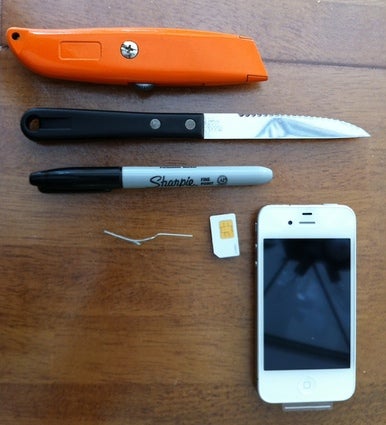
To carve that SIM into a micro-SIM, you’ll want to gather a few tools: your unlocked iPhone, your T-Mobile SIM card, a sharp knife (I used a box cutter), and a pen or marker. You might want a cutting board, too.
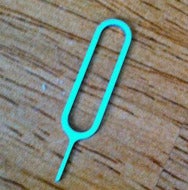
I used a paper clip, too, only to discover that Apple still does provide a SIM removal tool (it looks like a teeny, tiny dagger) with every iPhone 4. Oops. Well, if you lose it, you can still use a paper clip instead.

1. Find the slot


The included SIM-removal tool.
Locate the micro-SIM slot on your unlocked iPhone 4. It’s on the right edge and sports a tiny little hole, the perfect size for an unfolded paperclip—or that blasted SIM removal tool that I didn't notice in my iPhone 4 box.

2. Open with the SIM tool (or a paper clip)

Use that SIM tool for what it was intended for. Or, if you're like me, needlessly sacrifice a paper clip to the cause, and poke one end into the hole. I had to push with a fair amount of pressure to get the micro-SIM card tray to eject. Pull out the tray. If this is a brand new unlocked iPhone 4, it will be empty.

3. Trace your cutting path

Grab your full-sized T-Mobile SIM and your marker, and using the iPhone’s micro-SIM tray as a guide, trace around the edge of your SIM.

4. Cut the SIM

Now, you need to cut your SIM to micro-SIM size. The important part—the part you can’t cut—is the circuitry, and it’s really obvious: It’s the shiny part. As you cut your SIM card, leave the gold side facing you, so that you can be sure you don’t cut it.
If you cut the shiny part of your SIM card, it won’t work anymore. You can buy (and sometimes request from T-Mobile) a new one, but if all your contacts are stored on your current card, you don’t want to break yours. Measure twice, cut once. But also remember that you can always cut the card more if you leave it too big at first, but you can’t really make a too-small SIM bigger.
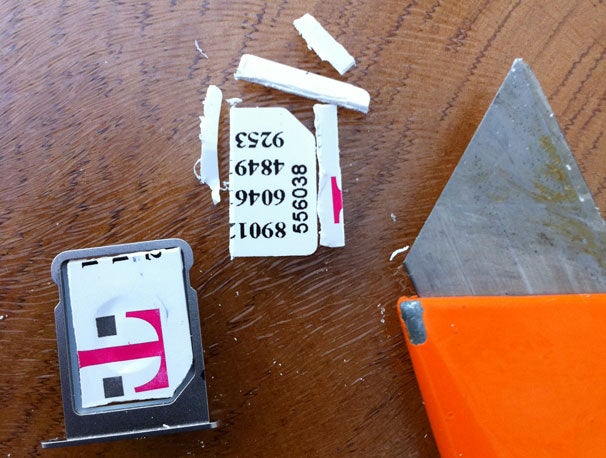
I traced some broad lines on my SIM card and then used my box cutter to saw deeply along the lines. (If you own an X-Acto knife or some similar weapon, you may find you have an easier time of it.) Once I sawed sharply enough I carefully used my fingers to bend and twist the SIM card—remaining, of course, exceedingly attentive to (and protective of) the circuitry—until the extra pieces snapped off.

5. Load it up

Once your SIM surgery is complete, your resized card should fit comfortably in the micro-SIM tray. The shiny part faces down, with what’s left of the T-Mobile logo facing up.
Slide the tray—with the SIM atop it—into the iPhone. If the iPhone still says No SIM after a moment, eject the tray again and try reorienting your card. In my case, the T-Mobile logo had to be oriented upside down for the iPhone to recognize the SIM.
After just a few seconds, your iPhone should successfully connect to the T-Mobile network. But—at least until the release of iOS 5—you’ll need to connect it to iTunes first. Plug the phone in, let iTunes perform its initial sync, and then disconnect your phone.

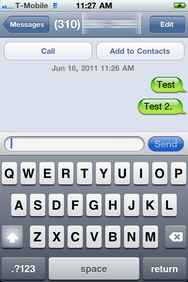
You should now be able to place calls and text messages with your iPhone 4, over T-Mobile’s network. Remember that some carrier-dependent features—like Visual Voicemail—won’t work.

The trouble with MMS


You know what else won’t work? MMS. The Camera icon for attaching photos or videos is missing entirely from the Messages app. But that one’s fixable—sort of. If you search the Internet, you’ll find various settings to tweak to get MMS working; until this week, all that information has generally been geared towards jailbreakers. In fact, in researching this piece, I contacted T-Mobile’s customer care, and the instructions they gave me for getting MMS working actually referenced Cydia, the app commonly installed automatically by most iPhone jailbreakers.
Here are the steps that T-Mobile hoped would enable me to send and receive MMS messages with the unlocked iPhone 4. Spoiler alert: It didn’t quite work.
Go to the Settings app, and choose General -> Network -> Cellular Data Network. Under MMS, set:
APN: epc.tmobile.com
Leave Username and Password blank.
MMSC: http://mms.msg.eng.t-mobile.com/mms/enc
MMSC Proxy: 216.155.165.50:8080
Leave MMS Max Message Size blank.
MMS UA Prof URL: http://www.apple.com/mms/uaprof.rdf
Then, back out to the main screen of the Settings app by tapping Network and then General, and then Settings at the top left; this ensures your newly-entered details are saved. Now, restart your iPhone by holding down the Sleep/Wake button until “Slide to Power Off” appears. Restart your iPhone by holding down that button again—waiting until the phone finishes shutting off completely first, of course.
When you restart your iPhone, the missing Camera icon should reappear in the Messages app. It did for me. But when I attempted to send or receive multimedia messages, it didn’t work. T-Mobile eventually suggested I contact Apple for support, and to Apple’s credit, the company did walk through several steps with me to try to correct the issue. Successful MMS’ing still eludes my setup, but if we figure it out, we’ll update this story.

T-Mo, Phone Home

So with the notable exceptions of 3G, MMS, and Visual Voicemail, your Apple-approved unlocked iPhone 4 should work just as you’d expect it to on T-Mobile’s network. You can install apps, sync and update with iTunes, and—in many ways, most importantly—pop in an international micro-SIM if you travel outside the country.
READ MORE - How to use an unlocked iPhone 4 with T-Mobile

Get Extra Email Addresses for your Gmail Account [Google Apps]

Facebook Offers A Wide Range Of Online Applications. Join Us Today!
gmailThere are quite a few ways by which you can create multiple email addresses inside Gmail.
For instance, if your email address is hello@gmail.com , any email that's addressed to either he.ll.o@gmail.com or hello+world@gmail.com will also be delivered to your main inbox since Gmail ignores dots and anything that’s after the plus symbol in email usernames.
Therefore, theoretically speaking, you get an unlimited number of email addresses with one Gmail account. This gets even more interesting if you are using Gmail with Google Apps.

Email Aliases in Gmail for Google Apps

In the case of Google Apps, you can assign nicknames to your email account and messages that are addressed to the nickname (or alias) are also delivered to you.
For instance, if you run a website at example.com, you can have one mail email address and then setup aliases like tips@example.com (for blog tips), advertise@example.com (for potential advertisers) and so on. Thus you have to deal with only one inbox.
email alias in google apps
To setup an email alias in Google Apps, log in to google.com/a/example.com as an admin (replace example.com with your domain name) and click the “Users and groups” option.
Select the email username for which you wish to setup aliases and then click “Add a nickname” to associate another email username with this user. You may associate up to 30 different nicknames per user in Google Apps.
When you reply to an email that’s addressed to one of your nicknames, the “From” address may still have your main email address. You can however change that quite easily.

add email address
Open your Gmail Inbox –> Settings –> Accounts and click “add another email address you own” under “send mail as.” Type your new email alias here, verify the code and you’ll now have an option to decide which of your email addresses should show up in the “From” field.
Thus, if you ever want a new email address, you don't have to create another user in Google Apps - just add a new nickname to your existing email address.
READ MORE - Get Extra Email Addresses for your Gmail Account [Google Apps]

Setting up Netatalk


Appletalk

AppleTalk, the network protocol family founded by Apple, contains different protocols for different uses (address resolution, address/name mapping, service location, establishing connections, and the like)
A complete overview can be found inside the developer documentation.

To use AppleTalk or not

You'll need the AppleTalk support built into netatalk in case you want to provide printing services via PAP by papd(8) or file services via AppleTalk via afpd(8) for older AFP clients not capable of using AFP over TCP. You'll need it also, if you want to use the deprecated AppleTalk-based timeserver timelord(8) for older Mac clients.
But even if you don't need PAP or AFP over AppleTalk, you might consider using AppleTalk for service propagation/location, having the ease of use for your network clients in mind. The Apple engineers implemented a way to easily locate an AFP server via AppleTalk but establishing the AFP connection itself via AFP over TCP (see the developer documentation for details on this cool feature, too).
To use the different base AppleTalk protocols with netatalk, one has to use atalkd(8). It can also be used as an AppleTalk router to connect different independent network segments to each other.
To use AppleTalk/atalkd, your system has to have kernel support for AppleTalk. On some systems supported by netatalk, this isn't currently true (notably True64 Unix) so you can use only netatalk services that do not rely on AppleTalk (which means "AFP over TCP" and requires the -noddp switch in afpd.conf).

No AppleTalk routing

This is the most simple form, you can use AppleTalk with netatalk. In case, you have only one network interface up and running, you haven't to deal with atalkd's config at all: atalkd will use AppleTalk's self-configuration features to get an AppleTalk address and to register itself in the network automagically.
In case, you have more than one active network interface, you have to make a decision:
  • Using only one interface: Just add the interface name (en1, le0, eth2, ... for example) to atalkd.conf on a single line. Do only list one interface here.
    Example 3.1. atalkd.conf containing one entry
    eth0
    Appletalk networking should be enabled on eth0 interface. All the necessary configuration will be fetched from the network

    At startup time, atalkd will add the real settings (address and network and eventually a zone) to atalkd.conf on its own
    Example 3.2. atalkd.conf containing one entry after atalkd started
    eth0 -phase 2 -net 0-65534 -addr 65280.166
    atalkd filled in the AppleTalk settings that apply to this network segment. A netrange of 0-65534 indicates that there is no AppleTalk router present, so atalkd will fetch an address that matches the following criteria: netrange from inside the so called "startup range" 65280-65533 and a node address between 142 and 255.
  • When using several interfaces you have to add them line by line following the "-dontroute" switch in atalkd.conf.
    Example 3.3. atalkd.conf containing several entries with the -dontroute option
    eth0 -dontroute
    eth1 -dontroute
    eth2 -dontroute
    Appletalk networking should be enabled on all three interfaces, but no routing should be done between the different segments. Again, all the necessary configuration will be fetched from the connected networks.

    Example 3.4. atalkd.conf containing several entries with the -dontroute option after atalkd started
    eth0 -dontroute -phase 2 -net 0-65534 -addr 65280.152
    eth1 -dontroute -phase 2 -net 0-65534 -addr 65280.208
    eth2 -dontroute -phase 2 -net 1-1000 -addr 10.142 -zone "Printers"
    On eth0 and eth1, there are no other routers present, so atalkd chooses an address from within the startup range. But on eth2 there lives an already connected AppleTalk router, publishing one zone called "Printers" and forcing clients to assign themselves an address in a netrange between 1 and 1000.

    In this case, atalkd will handle each interface as it would be the only active one. This can have some side effects when it comes to the point where AFP clients want to do the magic switch from AppleTalk to TCP, so use this with caution.
In case, you have more than one active network interface and do not take special precautions as outlined above, then autoconfiguration of the interfaces might fail in a situation where one of your network interfaces is connected to a network where no other active AppleTalk router is present and supplies appropriate routing settings.
For further information see atalkd.conf(5) and the developer documentation.

atalkd acting as an AppleTalk router

There exist several types of AppleTalk routers: seed, non-seed and so called soft-seed routers.
  • A seed router has its own configuration and publishes this into the network segments it is configured for.
  • A non-seed router needs a seed router on the interface to which it is connected to learn the network configuration. So this type of AppleTalk router can work completely without manual configuration.
  • A so called soft-seed router is exactly the same as a non-seed router except the fact, that it can also remember the configuration of a seed router and act as a replacement in case, the real seed router disappears from the net.
Netatalk's atalkd can act as both a seed and a soft-seed router, even in a mixed mode, where it acts on one interface in this way and on the other in another.
If you leave your atalkd.conf completely empty or simply add all active interfaces line by line without using seed settings (atalkd will act identically in both cases), then atalkd is forced to act as a soft-seed router on each interface, so it will fail on the first interface, where no seed router is accessible to fetch routing information from.
In this case, other services, that depend on atalkd, might also fail.
So you should have atalkd act as a seed router on one or all active interfaces. A seed router has to supply informations about:
  • The specific netrange on this segment
  • Its own AppleTalk address
  • The zones (one to many) available in this segment
  • The so called "default zone" for this segment

Warning

Unless you are the network admin yourself, consider asking her/him before changing anything related to AppleTalk routing, as changing these settings might have side effects for all of your AppleTalk network clients!
In an AppleTalk network netranges have to be unique and must not overlap each other. Fortunately netatalk's atalkd is polite enough to check whether your settings are in conflict with already existing ones on the net. In such a case it simply discards your settings and tries to adapt the already established ones on the net (if in doubt, always check syslog for details).
Netranges, you can use, include pretty small ones, eg. 42-42, to very large ones, eg. 1-65279 - the latter one representing the maximum. In routed environments you can use any numbers in the range between 1 and 65279 unless they do not overlap with settings of other connected subnets.
The own AppleTalk address consists of a net part and a node part (the former 16 bit, the latter 8 bit, for example 12057.143). Apple recommends using node addresses of 128 or above for servers, letting client Macs assign themselves an address faster (as they will primarily search for a node address within 1-127 in the supplied netrange). As we don't want to get in conflict with Apple servers, we prefer using node addresses of 142 or above.
AppleTalk zones have nothing to do with physical networks. They're just a hint for your client's convenience, letting them locate network resources in a more comfortable/faster way. You can either use one zone name across multiple physical segments as well as more than one zone name on a single segment (and various combinations of this).
So all you have to do is to draw a network chart containing the physical segments, the netranges you want to assign to each one, the zone names you want to publish in which segments and the default zone per segment (this is always the first zone name, you supply with the "-zone" switch in atalkd.conf).
Given, you finished the steps outlined above, you might want to edit atalkd.conf to fit your needs.
You'll have to set the following options in atalkd.conf:
  • -net (use reasonable values between 1-65279 for each interface)
    In case, this value is suppressed but -addr is present, the netrange from this specific address will be used
  • -addr (the net part must match the -net settings if present, the node address should be between 142 and 255)
  • -zone (can be used multiple times in one single line, the first entry is the default zone)
Note that you are able to set up "zone mapping", that means publishing exactly the same zone name on all AppleTalk segments, as well as providing more than one single zone name per interface. Dumb AppleTalk devices, like LaserWriters, will always register themselves in the default zone (the first zone entry you use in atalkd.conf per interface), more intelligent ones will have the ability to choose one specific zone via a user interface.
Example 3.5. atalkd.conf making netatalk a seed router on two interfaces
eth0 -seed -phase 2 -net 1-1000 -addr 1000.142 -zone "Printers" -zone "Spoolers"
eth1 -seed -phase 2 -net 1001-2000 -addr 2000.142 -zone "Macs" -zone "Servers"
The settings for eth0 force AppleTalk devices within the connected network to assign themselves an address in the netrange 1-1000. Two zone names are published into this segment, "Printers" being the so called "standard zone", forcing dumb AppleTalk devices like Laser printers to show up automatically into this zone. AppleTalk printer queues supplied by netatalk's papd can be registered into the zone "Spoolers" simply by adjusting the settings in papd.conf(5). On eth1 we use the different and non-overlapping netrange 1001-2000, set the default zone to "Macs" and publish a fourth zone name "Servers".

Example 3.6. atalkd.conf configured for "zone mapping"
eth0 -seed -phase 2 -net 1-1000 -addr 1000.142 -zone "foo"
lo0 -phase 1 -net 1 -addr 1.142 -zone "foo"
We use the same network settings as in the example above but let atalkd publish the same zone name on both segments. As the same zone name will be used on all segments of the AppleTalk network no zone names will show up at all... but AppleTalk routing will still be active. In this case, we connect a so called "non-extended" LocalTalk network (phase 1) to an EtherTalk "extended" network (phase 2) transparently.

Example 3.7. atalkd.conf for a soft-seed router configuration
eth0
eth1
eth2
As we have more than one interface, atalkd will try to act as an AppleTalk router between both segments. As we don't supply any network configuration on our own we depend on the availability of seed routers in every connected segment. If only one segment is without such an available seed router the whole thing will fail.

Example 3.8. atalkd.conf for a soft-seed router configuration after atalkd started
eth0 -phase 2 -net 10-10 -addr 10.166 -zone "Parking"
eth1 -phase 2 -net 10000-11000 -addr 10324.151 -zone "No Parking" -zone "Parking"
eth2 -phase 2 -net 65279-65279 -addr 65279.142 -zone "Parking" -zone "No Parking"
In this case, active seed routers are present in all three connected networks, so atalkd was able to fetch the network configuration from them and, since the settings do not conflict, act as a soft-seed router from now on between the segments. So even in case, all of the three seed routers would disappear from the net, atalkd would still supply the connected network with the network configuration once learned from them. Only in case, atalkd would be restarted afterwards, the routing information will be lost (as we're not acting as seed router).

Example 3.9. atalkd.conf ready for mixed seed/soft-seed mode
eth0
eth1 -seed -phase 2 -net 99-100 -addr 99.200 -zone "Testing"
In case in the network connected to eth0 lives no active seed router or one with a mismatching configuration (eg. an overlapping netrange of 1-200) atalkd will fail. Otherwise it will fetch the configuration from this machine and will route between eth0 and eth1, on the latter acting as a seed router itself.

By the way: It is perfectly legal to have more than one seed router connected to a network segment. But in this case, you should take care that the configuration of all connected routers is exactly the same regarding netranges, published zone names and also the "standard zone" per segment

File Services

Netatalk supplies two different transport protocols for AFP services and both can run at the same time. Classic AFP over AppleTalk requires the afpd and atalkd daemons. AFP over IP only requires afpd.

Setting up the AFP file server

AFP (the Apple Filing Protocol) is the protocol Apple Macintoshes use for file services. The protocol has evolved over the years. The latest changes to the protocol, called "AFP 3.3", were added with the release of Snow Leopard (Mac OS X 10.6).
AFP3 brought some big changes. For the first time, AppleShare Clients can use filenames up to 255 characters (actually 255 bytes leading to 85-255 chars depending on the glyphs used), UTF-8 is used on the wire and large files (>4GB) are supported.
The afpd daemon offers the fileservices to Apple Clients. It's configured using the afpd.conf and the AppleVolumes.* files.
Mac OS X 10.5 (Leopard) added support for Time Machine backups over AFP. Two new functions ensure that backups are written to spinning disk, not just in the server's cache. Different host operating systems honour this cache flushing differently. To make a volume a Time Machine target use the AppleVolumes.default(5) volume option tm.

afpd.conf

afpd.conf is the configuration file used by afpd to determine the behaviour and configuration of the different virtual file servers that it provides. Any line not prefixed with '#' is interpreted.
If afpd switches set on the command line are in conflict with afpd.conf settings, the latter will have higher priority.
Format: - [options] to specify options for the default server and/or "Server name" [options] to specify an additional server.
Leaving the afpd.conf file empty equals to the following configuration:
- -transall -uamlist uams_guest.so,uams_clrtxt.so,uams_dhx.so -nosavepassword
For a more detailed explanation of the available options, please refer to the afpd.conf(5) man page.

AppleVolumes.default

The AppleVolumes.default file is used to define volumes that will by default be shown to all users, including users logged in as guest. A volume will not be presented in the chooser, if the user has no read access to the specified volume path.
You can limit access to a specific volume by using the allow and deny options.
For a more detailed explanation of the available options, please refer to the AppleVolumes.default(5) man page.

CNID backends

Unlike other protocols like smb or nfs, the AFP protocol mostly refers to files and directories by ID and not by a path (the IDs are also called CNID, that means Catalog Node ID). A typical AFP request uses a directory ID and a filename, something like "server, please open the file named 'Test' in the directory with id 167". For example "Aliases" on the Mac basically work by ID (with a fallback to the absolute path in more recent AFP clients. But this applies only to Finder, not to applications).
Every file in an AFP volume has to have a unique file ID, IDs must, according to the specs, never be reused, and IDs are 32 bit numbers (Directory IDs use the same ID pool). So, after ~4 billion files/folders have been written to an AFP volume, the ID pool is depleted and no new file can be written to the volume. No whining please :-)
Netatalk needs to map IDs to files and folders in the host filesystem. To achieve this, several different CNID backends are available and can be choosed by the cnidscheme option in the AppleVolumes.default(5) configuration file. A CNID backend is basically a database storing ID <-> name mappings.
In the past, many users used the so called "last" CNID scheme. However, this scheme has some serious drawbacks, as it is based on the device and inode of a file. Therefore, IDs will be eventually be reused and you can get duplicate IDs as well.
The CNID Databases are by default located in the .AppleDB folder in every afpd volume root. With the new ADv2 format, afpd stores the files/directories ID in the corresponding .AppleDouble file as well.

Note

There are some CNID related things you should keep in mind when working with netatalk:
  • Don't use unix symlinks. Just don't. With a symlink a file/directory "exists" twice, something AFP doesn't allow. There's currently no way this can be resolved, as we either end up with two file/dirs having the same id, or a file having two parents. If you still insist on using them, be aware you're heavily violating the specs. You have been warned...
  • Don't nest volumes.
  • CNID backends are databases, so they turn afpd into a file server/database mix. Keep this in mind, killing an afpd process with kill -9 will likely leave the database unusable.
  • If there's no more space on the filesystem left, the database will get corrupted. You can work around this by either using the -dbpath option and put the database files into another location or, if you use quotas, make sure the .AppleDB folder is owned by a user/group without a quota.
  • Be careful with CNID databases for volumes that are mounted via NFS. That is a pretty audacious decision to make anyway, but putting a database there as well is really asking for trouble, i.e. database corruption. Use the dbpath: directive in the AppleVolumes.* configuration files to put the databases onto a local disk if you must use NFS mounted volumes.

cdb

The "concurrent database" backend is based on sleepycat's Berkeley DB. With this backend, several afpd daemons access the CNID database directly. Berkeley DB locking is used to synchronize access, if more than one afpd process is active for a volume. The drawback is, that the crash of a single afpd process might corrupt the database.

dbd

Access to the CNID database is restricted to the cnid_dbd daemon process. afpd processes communicate with the daemon for database reads and updates. If built with Berkeley DB transactions, the probability for database corruption is practically zero, but performance can be slower than with cdb. As a database process gets spawned for each volume, you're probably better off using cdb for sharing home directories for a larger number of users.

last

The last backend is a semi-persistent backend. IDs will be reused and, what is much worse, you can get duplicate IDs. You should use it for sharing cdroms only, don't use it for sharing normal volumes.

Charsets/Unicode

Why Unicode?

Internally, computers don't know anything about characters and texts, they only know numbers. Therefore, each letter is assigned a number. A character set, often referred to as charset or codepage, defines the mappings between numbers and letters.
If two or more computer systems need to communicate with each other, the have to use the same character set. In the 1960s the ASCII (American Standard Code for Information Interchange) character set was defined by the American Standards Association. The original form of ASCII represented 128 characters, more than enough to cover the English alphabet and numerals. Up to date, ASCII has been the normative character scheme used by computers.
Later versions defined 256 characters to produce a more international fluency and to include some slightly esoteric graphical characters. Using this mode of encoding each character takes exactly one byte. Obviously, 256 characters still wasn't enough to map all the characters used in the various languages into one character set.
As a result localized character sets were defined later, e.g the ISO-8859 character sets. Most operating system vendors introduced their own characters sets to satisfy their needs, e.g. IBM defined the codepage 437 (DOSLatinUS), Apple introduced the MacRoman codepage and so on. The characters that were assigned number larger than 127 were referred to as extended characters. These character sets conflict with another, as they use the same number for different characters, or vice versa.
Almost all of those characters sets defined 256 characters, where the first 128 (0-127) character mappings are identical to ASCII. As a result, communication between systems using different codepages was effectively limited to the ASCII charset.
To solve this problem new, larger character sets were defined. To make room for more character mappings, these character sets use at least 2 bytes to store a character. They are therefore referred to as multibyte character sets.
One standardized multibyte charset encoding scheme is known as unicode. A big advantage of using a multibyte charset is that you only need one. There is no need to make sure two computers use the same charset when they are communicating.

character sets used by Apple

In the past, Apple clients used single-byte charsets to communicate over the network. Over the years Apple defined a number of codepages, western users will most likely be using the MacRoman codepage.
Codepages defined by Apple include:
  • MacArabic, MacFarsi
  • MacCentralEurope
  • MacChineseSimple
  • MacChineseTraditional
  • MacCroation
  • MacCyrillic
  • MacDevanagari
  • MacGreek
  • MacHebrew
  • MacIcelandic
  • MacKorean
  • MacJapanese
  • MacRoman
  • MacRomanian
  • MacThai
  • MacTurkish
Starting with Mac OS X and AFP3, UTF-8 is used. UTF-8 encodes Unicode characters in an ASCII compatible way, each Unicode character is encoded into 1-6 ASCII characters. UTF-8 is therefore not really a charset itself, it's an encoding of the Unicode charset.
To complicate things, Unicode defines several normalization forms. While samba uses precomposed Unicode, which most Unix tools prefer as well, Apple decided to use the decomposed normalization.
For example lets take the German character 'ä'. Using the precomposed normalization, Unicode maps this character to 0xE4. In decomposed normalization, 'ä' is actually mapped to two characters, 0x61 and 0x308. 0x61 is the mapping for an 'a', 0x308 is the mapping for a COMBINING DIAERESIS.
Netatalk refers to precomposed UTF-8 as UTF8 and to decomposed UTF-8 as UTF8-MAC.

afpd and character sets

To support new AFP 3.x and older AFP 2.x clients at the same time, afpd needs to be able to convert between the various charsets used. AFP 3.x clients always use UTF-8, AFP 2.2 clients use one of the Apple codepages.
At the time of this writing, netatalk supports the following Apple codepages:
  • MAC_CENTRALEUROPE
  • MAC_CYRILLIC
  • MAC_HEBREW
  • MAC_ROMAN
  • MAC_TURKISH
  • MAC_GREEK
afpd handles three different character set options:

unixcodepage
This is the codepage used internally by your operating system. If not specified and your system support Unix locales, afpd tries to detect the codepage, otherwise it defaults to ASCII. afpd uses this codepage to read its configuration files, so you can use extended characters for volume names, login messages, etc. see afpd.conf(5).
maccodepage
As already mentioned, older MacOS clients (up to AFP 2.2) use codepages to communicate with afpd. However, there is no support for negotiating the codepage used by the client in the AFP protocol. If not specified otherwise, afpd assumes the MacRoman codepage is used. In case you're clients use another codepage, e.g. MacCyrillic, you'll have to explicitly configure this. see afpd.conf(5).
volcharset
This defines the charset afpd should use for filenames on disk. The default is UTF8. If you have iconv installed, you can use any iconv provided charset as well. afpd needs a way to preserve extended macintosh characters, or characters illegal in unix filenames, when saving files on a unix filesystem. Earlier versions used the the so called CAP encoding. An extended character (>0x7F) would be converted to a :xx hex sequence, e.g. the Apple Logo (MacRoman: 0XF0) was saved as :f0. Some special characters will be converted as to :xx notation as well. '/' will be encoded to :2f, if -usedots is not specified, a leading dot '.' will be encoded as :2e. Even though this version now uses UTF-8 as the default encoding for filenames, special characters, like '/' and a leading '.' will still be CAP style encoded. For western users another useful setting could be -volcharset ISO-8859-15. If a character cannot be converted from the mac codepage to the selected volcharset, afpd will save it as a CAP encoded character. For AFP3 clients, afpd will convert the UTF-8 character to maccodepage first. If this conversion fails, you'll receive a -50 error on the mac. Note: Whenever you can, please stick with the default UTF-8 volume format. see AppleVolumes.default(5).

Authentication

AFP authentication basics

Apple chose a flexible model called "User Authentication Modules" (UAMs) for authentication purposes between AFP client and server. An AFP client initially connecting to an AFP server will ask for the list of UAMs which the server provides, and will choose the one with strongest encryption that the client supports.
Several UAMs have been developed by Apple over the time, some by 3rd-party developers.

UAMs supported by Netatalk

Netatalk supports the following ones by default:
  • "No User Authent" UAM (guest access without authentication)
  • "Cleartxt Passwrd" UAM (no password encryption)
  • "Randnum exchange"/"2-Way Randnum exchange" UAMs (weak password encryption, separate password storage)
  • "DHCAST128" UAM (stronger password encryption)
  • "DHX2" UAM (successor of DHCAST128)
There exist other optional UAMs as well:
  • "PGPuam 1.0" UAM (PGP-based authentication for pre-Mac OS X clients. You'll also need the PGPuam client to let this work)
    You'll have to add "--enable-pgp-uam" to your configure switches to have this UAM available.
  • "Kerberos IV"/"AFS Kerberos" UAMs (suitable to use Kerberos v4 based authentication and AFS file servers)
    Use "--enable-krb4-uam" at compile time to activate the build of this UAM.
  • "Client Krb v2" UAM (Kerberos V, suitable for "Single Sign On" Scenarios with Mac OS X clients -- see below)
    "--enable-krbV-uam" will provide you with the ability to use this UAM.
You can configure which UAMs should be activated by defining $AFPD_UAM_LIST in netatalk.conf(5). afpd will log which UAMs it's using and if problems occur while activating them in either netatalk.log or syslog at startup time. asip-status.pl(1) can be used to query the available UAMs of AFP servers as well.
Having a specific UAM available at the server does not automatically mean that a client can use it. Client-side support is also necessary. Fortunately this isn't such a problem these days since Mac OS X' AFP-client supports DHCAST128 from the beginning on. For older Macintoshes running Mac OS < X DHCAST128 support exists since AppleShare client 3.8.x.
On Mac OS X, there exist some client-side techniques to make the AFP-client more verbose, so one can have a look what's happening while negotiating the UAMs to use. Compare with this hint.

Which UAMs to activate?

It depends primarily on your needs and on the kind of Mac OS versions you have to support. Basically one should try to use DHCAST128 where possible because of its strength of password encryption.
  • Unless you really have to supply guest access to your server's volumes ensure that you disable "No User Authent" since it might lead accidentally to unauthorized access. In case you must enable guest access take care that you enforce this on a per volume base using the access controls the AppleVolumes.default(5) config file supplies or think about setting up an own server definition serving these public shares in afpd.conf(5).
  • The "ClearTxt Passwrd" UAM is as bad as it sounds since passwords go unencrypted over the wire. Try to avoid it at both the server's side as well as on the client's. Note: If you want to provide Mac OS 8/9 clients with NetBoot-services then you need uams_cleartext.so since the AFP-client integrated into the Mac's firmware can only deal with this basic form of authentication.
  • Since "Randnum exchange"/"2-Way Randnum exchange" uses only 56 bit DES for encryption it should be avoided as well. Another disadvantage is the fact that the passwords have to be stored in cleartext on the server and that it doesn't integrate into both PAM scenarios or classic /etc/shadow (you have to administrate passwords separately by using the afppasswd(1) utility, if clients should use these UAMs)
  • "DHCAST128" or "DHX2" should be a good compromise for most people since it combines stronger encryption with PAM integration.
  • Using the Kerberos V ("Client Krb v2") UAM, it's possible to implement real single sign on scenarios using Kerberos tickets. The password is not sent over the network. Instead, the user password is used to decrypt a service ticket for the appleshare server. The service ticket contains an encryption key for the client and some encrypted data (which only the appleshare server can decrypt). The encrypted portion of the service ticket is sent to the server and used to authenticate the user. Because of the way that the afpd service principal detection is implemented, this authentication method is vulnerable to man-in-the-middle attacks.
For a more detailed overview over the technical implications of the different UAMs, please have a look at Apple's File Server Security pages.

Using different authentication sources with specific UAMs

Some UAMs provide the ability to use different authentication "backends", namely uams_cleartext.so, uams_dhx.so and uams_dhx2.so. They can use either classic Unix passwords from /etc/passwd (/etc/shadow) or PAM if the system supports that. uams_cleartext.so can be symlinked to either uams_passwd.so or uams_pam.so, uams_dhx.so to uams_dhx_passwd.so or uams_dhx_pam.so and uams_dhx2.so to uams_dhx2_passwd.so or uams_dhx2_pam.so.
So, if it looks like this in Netatalk's UAMs folder (per default /etc/netatalk/uams/):
uams_clrtxt.so -> uams_pam.so
uams_dhx.so -> uams_dhx_pam.so
uams_dhx2.so -> uams_dhx2_pam.so
then you're using PAM, otherwise classic Unix passwords. The main advantage of using PAM is that one can integrate Netatalk in centralized authentication scenarios, eg. via LDAP, NIS and the like. Please always keep in mind that the protection of your user's login credentials in such scenarios also depends on the strength of encryption that the UAM in question supplies. So think about eliminating weak UAMs like "ClearTxt Passwrd" and "Randnum exchange" completely from your network.

Netatalk UAM overview table

A small overview of the most common used UAMs.
Table 3.1. Netatalk UAM overview
UAMNo User AuthentCleartxt Passwrd(2-Way) Randnum exchangeDHCAST128DHX2Client Krb v2
pssword lengthguest accessmax. 8 charactersmax. 8 charactersmax. 64 charactersmax. 256 charactersKerberos tickets
Client supportbuilt-in into all Mac OS versionsbuilt-in in all Mac OS versions except 10.0. Has to be activated explicitly in recent Mac OS X versionsbuilt-in into almost all Mac OS versionsbuilt-in since AppleShare client 3.8.4, available as a plug-in for 3.8.3, integrated in Mac OS X' AFP clientbuilt-in since MacOS X 10.2built-in since MacOS X 10.2
EncryptionEnables guest access without authentication between client and server.Password will be sent in cleartext over the wire. Just as bad as it sounds, therefore avoid at all if possible (note: providing NetBoot services requires the ClearTxt UAM)8-byte random numbers are sent over the wire, comparable with DES, 56 bits. Vulnerable to offline dictionary attack. Requires passwords in clear on the server.Password will be encrypted with 128 bit SSL, user will be authenticated against the server but not vice versa. Therefor weak against man-in-the-middle attacks.Password will be encrypted using libgcrypt with CAST 128 in CBC mode. User will be authenticated against the server but not vice versa. Therefor weak against man-in-the-middle attacks.Password is not sent over the network. Due to the service principal detection method, this authentication method is vulnerable to man-in-the-middle attacks.
Server supportuams_guest.souams_cleartxt.souams_randnum.souams_dhx.souams_dhx2.souams_gss.so
Password storage methodNoneEither /etc/passwd (/etc/shadow) or PAMPasswords stored in clear text in a separate text fileEither /etc/passwd (/etc/shadow) or PAMEither /etc/passwd (/etc/shadow) or PAMAt the Kerberos Key Distribution Center*

* Have a look at this Kerberos overview

SSH tunneling

Tunneling and all sort of VPN stuff has nothing to do with AFP authentication and UAMs in general. But since Apple introduced an option called "Allow Secure Connections Using SSH" and many people tend to confuse both things, we'll speak about that here too.
Manually tunneling an AFP session
This works since the first AFP servers that spoke "AFP over TCP" appeared in networks. One simply tunnels the remote server's AFP port to a local port different than 548 and connects locally to this port afterwards. On MacOS X this can be done by
ssh -l $USER $SERVER -L 10548:127.0.0.1:548 sleep 3000
After establishing the tunnel one will use "afp://127.0.0.1:10548" in the "Connect to server" dialog. All AFP traffic including the initial connection attempts will be sent encrypted over the wire since the local AFP client will connect to the Mac's local port 10548 which will be forwarded to the remote server's AFP port (we used the default 548) over SSH.
These sorts of tunnels are an ideal solution if you've to access an AFP server providing weak authentications mechanisms through the Internet without having the ability to use a "real" VPN. Note that you can let ssh compress the data by using its "-C" switch and that the tunnel endpoints can be different from both AFP client and server (compare with the SSH documentation for details).
Automatically establishing a tunneled AFP connection
Starting with Mac OS X 10.2 Apple added an "Allow Secure Connections Using SSH" checkbox to the "Connect to Server" dialog. The idea behind: When the server signals that it can be contacted by SSH then Mac OS X' AFP client tries to establish the tunnel and automagically sends all AFP traffic through it.
But it took until the release of Mac OS X 10.3 that this feature worked the first time... partly. In case, the SSH tunnel can't be established the AFP client silently fell back to an unencrypted AFP connection attempt.
Netatalk's afpd will report that it is capable of handling SSH tunneled AFP requests, when both -advertise_ssh and -fqdn options are set in afpd.conf(5) (double check with asip-status.pl(1) after you restarted afpd when you made changes to the settings). But there are a couple of reasons why you don't want to use this option at all:
  • Tunneling TCP over TCP (as SSH does) is not the best idea. There exist better solutions like VPNs based on the IP layer.
  • Since this SSH kludge isn't a normal UAM that integrates directly into the AFP authentication mechanisms but instead uses a single flag signalling clients whether they can try to establish a tunnel or not, it makes life harder to see what's happening when things go wrong.
  • You cannot control which machines are logged on by Netatalk tools like nu or macusers since all connection attempts seem to be made from localhost.
  • On the other side you've to limit access to afpd to localhost only (TCP wrappers) and disable AFP over DDP when you want to ensure that all AFP sessions are SSH encrypted or...
  • ...when you're using 10.2 - 10.3.3 then you get the opposite of what you'd expect: potentially unencrypted AFP communication (including logon credentials) on the network without a single notification that establishing the tunnel failed. Apple fixed that not until Mac OS X 10.3.4.
  • Encrypting all AFP sessions via SSH can lead to a significantly higher load on the Netatalk server

Printing

Netatalk can act as both a PAP client to access AppleTalk-capable printers and a PAP server. The former by using the pap(1) utility and the latter by starting the papd(8) service.
The "Printer Access Protocol" as part of the AppleTalk protocol suite is a fully 8 bit aware and bidirectional printing protocol, developed by Apple in 1985. 8 bit aware means that the whole set of bytes can be used for printing (binary encoding). This has been a great advantage compared with other protocols like Adobe's Standard Protocol to drive serial and parallel PostScript printers (compare with Adobe TechNote 5009) or LPR which made only use of the lower 128 bytes for printing because the 8th bit has been reserved for control codes.
Bidirectional means that printing source (usually a Macintosh computer) and destination (a printer or spooler implementation) communicate about both destination's capabilities via feature queries (compare with Adobe TechNote 5133) and device status. This allows the LaserWriter driver on the Macintosh to generate appropriate device specific PostScript code (color or b/w, only embedding needed fonts, and so on) on the one hand and notifications about the printing process or problems (paper jam for example) on the other.

Setting up the PAP print server

Netatalk's papd is able to provide AppleTalk printing services for Macintoshes or, to be more precise, PAP clients in general. Netatalk does not contain a full-blown spooler implementation itself, papd only handles the bidirectional communication and submittance of printjobs from PAP clients. So normally one needs to integrate papd with a Unix printing system like eg. classic SysV lpd, BSD lpr, LPRng, CUPS or the like.
Since it is so important to answer the client's feature queries correctly, how does papd achieve this? By parsing the relevant keywords of the assigned PPD file. That said, it's always necessary to carefully choose the right PPD at the server's side.
Netatalk formerly had built-in support for System V lpd printing in a way that papd saved the printed job directly into the spooldir and calls lpd afterwards, to pick up the file and do the rest. Due to incompatibilities with many lpd implementations the normal behaviour was to print directly into a pipe instead of specifying a printer by name and using lpd interaction. With Netatalk 2.0 another alternative has been implemented: direct interaction with CUPS (Note: when CUPS support is compiled in, then the SysV lpd support doesn't work at all). Detailed examples can be found in the papd.conf(5) manual page.

Integrating papd with SysV lpd

Unless CUPS support has been compiled in (which is default from Netatalk 2.0 on) one simply defines the lpd queue in question by setting the pr parameter to the queue name. If no pr parameter is set, the default printer will be used.

Using pipes with papd

An alternative to the technique outlined above is to direct papd's output via a pipe into another program. Using this mechanism almost all printing systems can be driven.

Using direct CUPS support

Starting with Netatalk 2.0, direct CUPS integration is available. In this case, defining only a queue name as pr parameter won't invoke the SysV lpd daemon but uses CUPS instead. Unless a specific PPD has been assigned using the pd switch, the PPD configured in CUPS will be used by papd, too.
There exists one special share named "cupsautoadd". If this is present in papd.conf, then all available CUPS queues will be served automagically using the parameters assigned to this global share. But subsequent printer definitions can be used to override these global settings for individual spoolers.

Using AppleTalk printers

Netatalk's papstatus(8) can be used to query AppleTalk printers, pap(1) to print to them. With psf(8) there exists a lpd filter program suitable for converting other formats (like text) to PostScript output, do page accounting and eventually change the page order using psorder(1). But these days, modern printing systems like CUPS can do the latter tasks for themselves in a more reliable way.
pap can be used stand-alone or as part of an output filter or a CUPS backend (which is the preferred method since one does not have to deal with all the options).
Example 3.10. pap printing to a PostScript LaserWriter
pap -p"ColorLaserWriter 16/600@*" /usr/share/doc/gs/examples/tiger.ps
The file /usr/share/doc/gs/examples/tiger.ps is sent to a printer called "ColorLaserWriter 16/600" in the standard zone "*". The device type is "LaserWriter" (can be suppressed since it is the default).

Example 3.11. pap printing to a non-PostScript printer
gs -q -dNOPAUSE -sDEVICE=cdjcolor -sOutputFile=- test.ps | pap -E
GhostScript is used to convert a PostScript job to PCL3 output suitable for a Color DeskWriter. Since no file has been supplied on the command line, pap reads the data from stdin. The printer's address will be read from the .paprc file in the same directory, pap will be called (in our example simply containing "Color DeskWriter:DeskWriter@Printers"). The -E switch forces pap to not wait for an EOF from the printer.

Time Services

Using Netatalk as a time server for Macintoshes

timelord, an AppleTalk based time server, is deprecated these days. Use NTP instead.
For further information please have a look at the timelord(8) manual page.

Starting and stopping Netatalk

The Netatalk distribution comes with several operating system specific startup script templates that are tailored according to the options given to the "configure" script before compiling. Currently, templates are provided for NetBSD, BSD, RedHat, SuSE and True64. You can select to install the generated startup script(s) by specifying a system type to "configure". To automatically install startup scripts for e.g. the SuSE Linux distribution try to give the --enable-suse option to "configure". Some of the scripts can be further parametrized by the configuration file netatalk.conf (described in the netatalk.conf(5) manual page), some obtain that information in another, operating system specific way (like Netbsd).
Since new releases of Linux distributions appear all the time and the startup procedure for the other systems mentioned above might change as well, it is probably a good idea to not blindly install a startup script but to look at it first to see if it will work on your system. If you use Netatalk as part of a fixed setup, like a Linux distribution, an RPM or a BSD package, things will probably have been arranged properly for you. The following therefore applies mostly for people who have compiled Netatalk themselves.
The following daemons need to be started by whatever startup script mechanism is used:
  • atalkd (if you use the AppleTalk protocol)
  • afpd
  • cnid_metad (if the dbd CNID backend is used)
  • papd (if you want to provide print services via AppleTalk)
  • timelord (for old style time synchronisation via AppleTalk)
Additionally, make sure that the various configuration files (afpd.conf, AppleVolumes.default, papd.conf etc.) are in the right place and that netatalk.conf (if used) contains the right entries. If you want e.g. papd to be started using this mechanism, set the environment variable "PAPD_RUN" to "yes" in netatalk.conf. See the manual pages for details.
READ MORE - Setting up Netatalk

The Time Machine (2002)

READ MORE - The Time Machine (2002)

How to Use the New Web-Based Android Market

Browsing the Android Market has never been the most pleasurable experience—even if you're sitting in front of a computer, you're forced to search, browse, and download apps on your phone's tiny screen. Today, Google released a web-based Market, so you can browse, buy, and share Android applications right from your computer. Here's how it works.

Apart from the excellent third-party market AppBrain, the Android Market has always been limited to your phone. The new web-based Android Market site, though, changes everything: now you have a much more user-friendly Market that you can browse through on your desktop. You can get app details, send apps straight to your Android-powered phones or tablets, manage all the apps you own, and easily share them with your friends with links. (How novel!) Check out the video above to see Google's demo of the new Market; read on for the details.

Installing Apps From the Web Market

Requirements: While Google used a Nexus S in the demonstration of the new Market, they have confirmed that the new Market features work with Android 1.5 and above, so no one is left out. Thanks, Google!
By far the coolest feature of the new Market is the install process: you can buy and install apps right from the web interface, and they'll immediately download directly to your phone, so you'll be ready to use your newly-installed app the next time you pick up your phone.
Installing an app from its Market page is simple:
  1. Click the "Install" or "Buy" button at the top.
  2. You'll be prompted to choose a device on which to install the app—if you have multiple phones tied to the same Google account, it'll show you a list of phones compatible with the app. This prompt will also list the permissions the app requires (like internet access, phone status, etc.).
  3. Once you confirm the installation/purchase, your phone will immediately start downloading the app.
It isn't unlike how AppBrain's installer works, for those of you that have been using AppBrain to install and manage your apps.
If you want to see a list of apps you've bought and downloaded from the Market, you can view your account page right from the web-based Market and see the full list. From here, you can also push apps you've already bought to other devices, handy if you buy a new phone or have multiple phones (or tablets) tied to the same Google account. That way, you don't have to go searching for the app again.

Browsing the Market

What's nice about having the Market on your desktop is that it's a considerably more friendly to browse. The home page of has a list of categories and sub-categories on the left side, so you can jump right to any category of apps (like Communication, Finance, or Puzzle Games) right from the front page. The larger right portion of the page shows featured apps and best selling games, with tabs at the top of the pane that let you check out the top paid and top free apps (which again, contain a section for all apps and a section specifically for games). There's also a skybar that seems to disappear and reappear at random intervals showing big logos of featured apps.
When you click on an app from the front page, it will take you to the app's page. This page is pretty reminiscent of app pages in the mobile market, just easier to read. You've got a description of the app, screenshots, videos, and a few reviews on the front page, with a tab that lets you read more user reviews. The new Market also adds two other tabs to the page, that let youy view what permissions the app requires, as well as see a changelog for the most recent version—both really welcome features.
On the left side of the page, the Market gives you a list of other apps by that developer, as well as similar apps that you may like. The right side has other useful information like what version of Android it requires, how big the app is, and a QR code. You wont' need the QR code to install the app, what with the awesome install process described above, but its useful for sharing the app with your friends. Of course, you can always link them directly to the app's page (or its entry in the Market, if you open the link up on a phone) and share it on Twitter with the built-in Tweet button.

Other Features

The search tool that Google's built in to the Market is actually pretty helpful. Every page of the Market has a small search box in the upper right-hand corner, which will auto-suggest apps as you search for them. When you hit Enter, it will take you to your search results, complete with an "advanced options" button that lets you filter items by price (free or paid), sort by popularity, or even show items compatible with a specific device you own.
The other thing Google's added to the Market is in-app purchasing. This means that you'll finally be able to buy things from within an Android app, whether it be buying extra levels for a game, buying books in an e-reader app, or upgrading to an app's "pro" version directly. It's a pretty convenient feature, since before this, apps required you to go to your mobile browser or back to the Market to purchase these things. Now, you can do them from the app directly.

We're pretty excited about the new Market and its features, but what do you guys think? Is the new Market a Godsend, or would you just rather use AppBrain (or nothing at all?) Share your thoughts with us in the comments.
READ MORE - How to Use the New Web-Based Android Market

Hosting Gratis

Web hosting
shareyourthinkall searchengine portalsite download